Style 114 from the July 2016 issue of Burda Style Magazine features a wonderful blouse with an embellishment technique commonly referred to as the weaving of fabric strips. Burda Magazine refers to the front inset as a "plastron" which is a trimming, like a bib, for a woman's dress. In the late 18th century, a plastron typically featured lace or embroidery.


 |
| No pattern changes, not even the addition of a bust dart! |
Construction Notes:
 |
| Mark stitching lines so that decorative strips are uniform width. I mark the width of the finished fabric strip rather than the seam allowance. That way if the seam allowance is cut unevenly, the finished fabric strip will be accurate. |
 |
| Stitching line are marked in blue. |
 |
| Strip has been stitched and seam allowance pressed open. One seam allowance is ungraded (1/2" wide) while the other seam allowance is trimmed to 1/4". This makes the seam allowances less noticeable from the right side. |
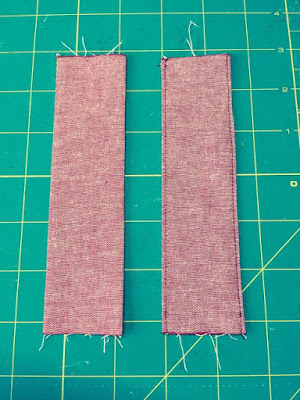 |
| I prefer the look of the fabric strip on the left. It has no top-stitching. I decided to top-stitch the strips because I wanted the blouse to launder well and not require complicated pressing. |
 |
| At left is the plastron with the placement of the fabric strips marked in chalk. The strips must fill the spaces exactly without being too wide nor too slim. If you mark the stitching lines as discussed above, this will not be difficult to achieve. At right the strips are pinned in place alone the marked lines. The strips will be trimmed to the proper shape later. |
 |
| View of inside of the plastron |
 |
| If you mark and stitch accurately, the right and left sides of the plastron will match nicely. |
 |
| The center front seam allowance is 5/8" in the above photo. My pattern has 1/2" seam allowances so despite my careful sewing, I am off 1/8" on each side of the blouse front. Therefore the total error is 1/4". I will widen the buttonhole band 1/4" to make up for the error. If chasing a 1/8" error is not your idea of fun, then let it go! The blouse fit is loose and it will be just fine whether you correct the error or not. This technique should be fun! |
Oh Ann I am so pleased you have featured this blouse, as I purchased the Burda Magazine which has this pattern.
ReplyDeleteNow I have seen your construction notes I will have a play and make this, once I have finished my knit dress.
As always you have made the garment beautifully. I have some spare linen so I think I will use that.
Thank you for sharing.
I thoroughly enjoyed making the plastron. I am happy to hear you were able to access the website as I have been making changes to the blog template all afternoon and that makes viewing difficult. I was able to add an Instagram feed but still no luck with Pinterest.
Delete