Marfy 2762 is the first new tutorial for 2013 and it is an advanced
design. Have you ever seen a jacket like this before? The
shoulder/sleeve lines remind me of a knight's armor. The collar, center
front edges, and belt create such a strong vertical line. The shoulder
and collar frame the face nicely. The pockets sit along the hem and
have round flaps that repeat the curved lines of the sleeves. A tie
belt is unexpected and relaxes the design.
To purchase the pattern try
http://shops.mccall.com/f2762-products-22790.php?page_id=3453 or
http://www.marfy.it/mod.-2762-en.html.
We have discussed Marfy Italian patterns before. They are for
advanced sewers because the patterns have no guidelines, instructions,
seam allowances, nor hem allowances. Fit is close to the body and the
size chart will probably tell you to go up one to two sizes above your
normal European size (Burda patterns come to mind). In Burda I work
with a size 40. In Marfy I will work with a 44.
I
could see this design in leather, boucle, textured fabrics, ikat
prints, denim, anything really. My main concern is that the
shoulder/sleeve panels lay smoothly and without extra fabric folds.
These are the fabrics I am considering for the jacket:
 |
| Black/gold/copper boucle type fabric |
This black fabric works with the "armor" theme due to the heavy use
of metallic threads and sequins on a mid weight fabric. I like the
stripes because I will be able to use them as lengthwise, crosswise and
bias stripes all within one garment. I purchased the fabric a few years
ago from
http://www.helenhaugheydesigns.com/Site/Photo_Gallery/Pages/Featured_Fabics.html.
Helen sells a collection of very fine fabrics from New York, Italy and
Paris. I purchase fabric from Helen when I see her, but her website has
a well curated selection. The fabric is costly as it is couture. I
frequently use couture fabrics for jackets and find that couture jackets
are wardrobe workhorses and last for decades. Helen has a 40% off
winter fabric sale beginning February 1,2013 so check her website out or
contact her to describe what you are looking for (she has inventory
beyond the website).
 |
| Silk tussah from Vogue |
This fabric is an ivory silk tussah with pastel
pinks, blues, and greens. The fabric says Spring 2013 to me, works in
my wardrobe, and would be more casual than the black fabric. I
purchased the fabric yesterday at Vogue Fabrics in Evanston for $14.99
per yard. I don't know if the fabric is available online, but their
websites are
http://www.voguefabricsstore.com/ and
http://myvoguefabrics.com/.
II. Muslin work
A
test muslin will help me determine whether my fabric choices are
suitable. I plan to sew the jacket in two fabrics, at the same time,
because it is efficient to make multiples of a design. Ideally I would
use the same color thread for the multiples, but that is not possible
with these fabrics. The black couture fabric will be underlined in silk organza. The silk tussah will be underlined with fusi knit interfacing.
I traced around the pattern pieces directly onto unbleached unwashed
cotton muslin. I added 1/2" seam allowances, grain line arrows,
notches, and pocket placement lines. I used only these six pattern
pieces: Front, Side Front, Side Back, Center Back, Shoulder Yoke, and
Lower Front Sleeve. Here are the pattern shapes:
 |
| Center Front pattern |
 |
| Center Back pattern |
 |
| Side Front and Side Back patterns |
 |
| Yoke/Sleeve and Lower Front Sleeve |
 |
| Marfy 2762 Jacket Front view |
|
|
|
|
|
|
|
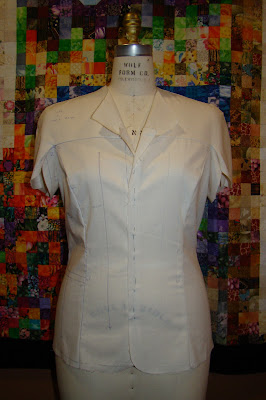
Here is the muslin on my dress form.
My initial observations on garment front fit:
1. The jacket is too large in the bust, both at the princess seam and the side seam.
2. The waist is large
3. The abdomen/hip area is tight.
4.
While the shoulders look smooth on the dress form, the garment feels
tight across my shoulders and there is no room for a raglan shoulder
pad. I want strong shoulder emphasis which requires a shoulder pad.
5.
The two piece sleeve detail is a nice design feature, but there is no
good way to sew these seams neatly and professionally (the lower front
sleeve panel has a top seam allowance that hangs suspended with no
armscye seam to join). What a nightmare it would be to line this
sleeve.
 |
| Sleeve Detail Jacket Front |
|
I have a 36" bust and this is a size 44 pattern. I should have
purchased a size 42; the fit in the bust and waist would have been
better, and I'm altering the hip circumference with either size.
 |
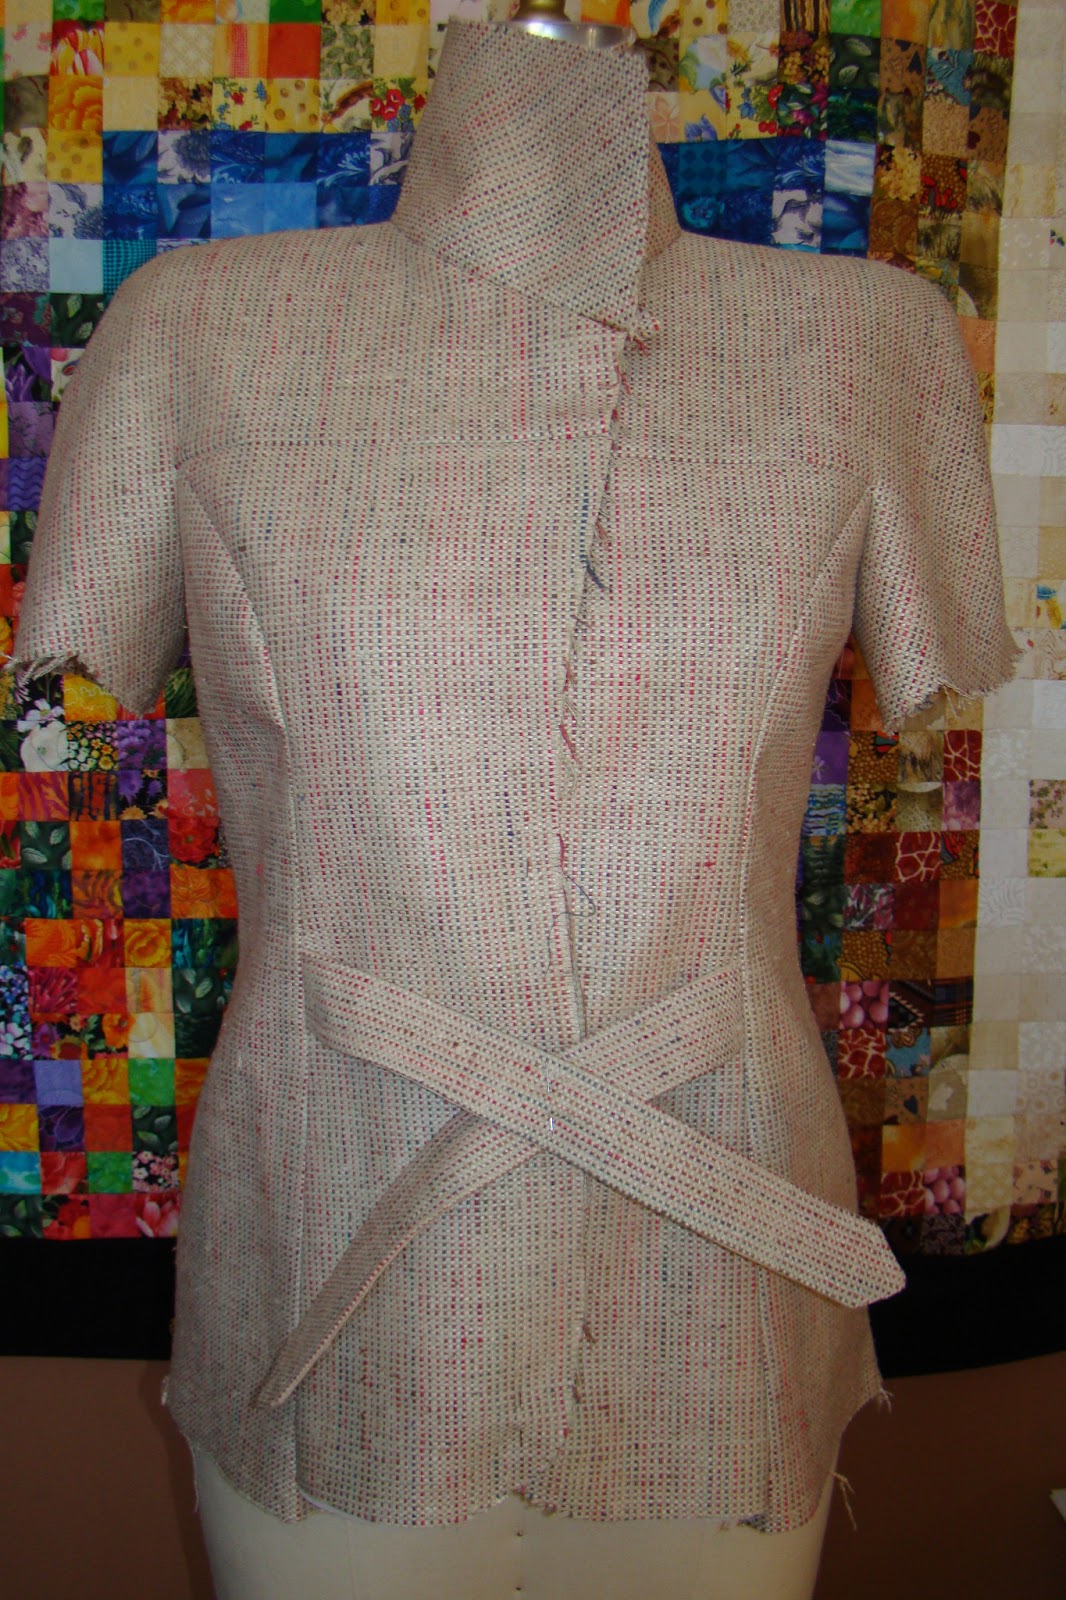
| Back view Marfy 2762 |
Notes on garment back view fit:
1. Garment lays nicely but it is a little roomy center back at the waist.
2. Again, a little more hip room would be flattering.
 |
| pinching center back at the waist |

I opened the shoulder seam 1" total at the notch to add room for my shoulder size and a shoulder pad.

Here
I pinned out excess fabric at the bust. The side front panel does not
need correction. The center front panel is where the excess fabric
needs to be removed. I know this because the princess seam lays to the
left/side of the bust center.
I am going
to add circumference to the abdomen/hip in the princess seams rather
than the side seams. The reasons are (1) I want to avoid a steep hip
curve that would look unnatural and (2) the abdomen and bum are what
needs additional circumference and they are more towards the center of
the body.
Here are the adjusted pattern pieces. Keep in mind there are no seam or hem allowances on these patterns.
Center Front: I added 1/4" to the hip here.
I
removed 5/8" from the bust (black ink scribbles to be cut away) and
folded out 1/2" in length at the bust. The princess seam will now run
over the bust point rather than to the left of it.
 |
| Side Back - Added 1/4" to hip |
 |
| Side Front - added 1/4" to hip |

Center Back: 1/4" added to hip.
Added 1/2" at the shoulder notch, tapering to nothing at the neck and sleeve hem.
Added 1/4" to upper center back to allow extra shoulder room.
Removed 1/4" from waist (black scribble section will be cut away).

Shoulder Yoke and Lower Front Sleeve
Joined Lower Front Sleeve permanently to Yoke/Sleeve.
Added 1/2" to shoulder at notch, tapering to nothing at the neck and sleeve hem.
These are the shoulder pads I plan to use.
This jacket will be fun to sew now that I have worked
out serious fit issues. These fit problems could not have been
corrected during construction.
III. Cutting and marking three layers: fashion fabric, interfacing/underlining, and lining
Mark stitching lines on all panels with tracing paper or thread and a hand sewing needle. This is more accurate than relying on seam allowance edges that fray during the construction process. Marked stitching lines and the use of underlining (interfacing or organza) are the most important factors in determining the quality of this jacket in my opinion. I applied fusi knit interfacing to all garment panels of the beige jacket.
 |
| use a ruler and tracing wheel to mark on wrong side |
Use light hand pressure on the tracing wheel to avoid bleed through to the right side.
 |
| traced stitch lines are made on wrong side which is interfaced |
The black jacket is underlined with silk organza. I applied fusible interfacing to key areas that will have narrow seam allowances. The interfacing is applied to the fashion fabric, not the organza.
 |
| the back underarm will be cut to the point; fusible interfacing is used in addition to silk organza |
The shoulder yoke has two sharp corners that need interfacing.
 |
| two corners interfaced, stitch lines thread traced by hand |
The lining is cut from the main pattern pieces, after a few adjustments. On the right side of the photo you see the front facing pattern over the center front pattern. The triangular wedge needs to be added to the front princess panel.
Here is the front princess panel lining. The beige jacket is lined in pink stretch charmeuse.
Adjust the shoulder yoke as well by laying the shoulder yoke pattern under the front facing pattern.
I used 1/2" seam allowances on the lining and marked corners and notches with tracing paper. The garment panels are cut with 1" seam allowances and 2" hem allowances. I do all cutting (fashion fabric, interfacing, lining), fusing and marking before sewing a stitch. Sewing is fast and fun with well marked panels that have been fit corrected.
Garment Assembly:
Belt: Stitch interfaced Belt and Belt Lining right sides together, stitching across point 1/4". Grade seam allowances as shown.
Press Belt Lining as shown.
Press Belt in same manner, folding corners.
Turn right side out and press.
If desired, top stitch belt 1/4" from edges. Belt edges are bulky, so shim presser foot to keep it level.
Baste belts to Center Front at marked waist location.
Stitch Center Front to Side Front along marked stitch lines. Do not stitch above marked stitch lines as this will distort the neckline.
Also do not stitch Center Front to Side Front at hem. Reinforce start and finish of seam securely.
Stitch side seams. Stitch Side Back to Side Front, cutting to within 1/4" of back armhole point. We will cut completely to the point later. Stitch Center Back to Side Back. Stitch Center Backs together.
Press all seams open. Clip only if necessary. The beige jacket needs several clips as the interfaced silk tussah is quite stiff. The black jacket needs few clips as the fabric is a loose weave and is not interfaced.
Trim seam allowances to 5/8". If you leave the seam allowances in this raw state, they will be covered by a lining but will continue to fray and will require a more extensive pressing after each cleaning.
I hand overcast the seam allowances to the silk organza. The stitches are close together, say 1/4" apart.
Stitch sleeve underarm seam. Note how uneven the seam allowances are by necessity. If the stitch lines were not marked, how would you stitch this area accurately? The tiny seam allowance at the top is not stitched.
Join underarm to yoke, breaking stitching at side seams i.e. do not trap vertical jacket side seam in lower armhole seam. Do not press underarm seam open.
Stitch Front Yoke to Sleeve, leaving top seam allowances free. In the photo below I will stop stitching at the red pin and reverse stitch to reinforce.
Trim the underarm seam allowances to 3/8". Hand overcast them to prevent fraying and hold them together.
Stitch the center back seam of the Under Collar which was cut on the bias. Press allowances open.
Join Under Collar to neck edge. Press allowances open.
This is what the jacket looks like at this point:
 |
| exterior of beige jacket |
 |
| interior view of beige jacket |
 |
| note clips are done at an angle to the stitching line |
Bulk is removed from hem allowance.
 |
| black jacket is in fine form |
The outer collar edges, the center front edges, and the hem are all hand stitched in place. This is the inside view.
I stitched the seams of the black silk charmeuse lining and pressed them to one side. Then I joined the front facings and under collar to the lining.
A 1" ease pleat was added at center back. Points and areas of stress were reinforced with fusible interfacing, similar to the fashion fabric.
Next I need a center front closure. I chose fur hooks because they are matte rather than shiny, so they will be inconspicuous. They are also large enough to easily encase the finished center front edges.
The hooks and eyes are sandwiched between the center front and front facing panels. Here are the hooks.
Now I need to join the lining/under collar/front facing unit to the garment. The first step is joining the neckline edges with hand stitches so the roll of the collar will be controlled. Here the seam is pinned, then stitched.
Now I pinned the outer edges of the collars together as well as the center front edges. I build roll into the collar so the original marked stitching lines of the upper collar are not necessarily followed. The fabric is bulky so I probably moved the upper collar stitching line out 3/8". I hand slip stitched the collar edges, center front edges in place. The lining hem is not yet sewn as I need to reach inside the jacket to stitch the pockets and pocket flaps.
The pattern tissue for the pocket and pocket flap is not accurate. The left and right curves don't exactly match. I traced the pattern tissue onto oak tag paper. Then will a ruler I drafted a "perfect" pocket and pocket flap template. Here is the pocket flap.
I will lay the templates on the fashion fabric when turned the seam allowances to the inside. If I follow the template, the pocket and flap edges will be symmetrical. I stitched the raw edges to the organza underlining by hand. Note the two lower curves match beautifully. Templates work!
I line the pocket to the edge by hand. First I arrange the lining neatly around the corners.
Once I'm satisfied I have not distorted the fashion fabric pocket, I hand stitch the lining in place. The stitches are close together, perhaps 3/16" apart and not pulled too tightly.
I hand stitched the pocket to the jacket side front, being careful to not catch the front facing/lining unit. Note how I have made good design use of the stripes in my fabric. I placed the pocket bottom edge along the hem which is new to me. I love the result.
The pocket might sag over time so I apply a small snap at the center. If the fabric was heavy, I might use three snaps per pocket. One seems to work fine as the silk organza provides some support.
The pocket flap is lined to the edge by hand.
I hand stitched the pocket flap 1/2" above the pocket. If the pocket flap did not lap nicely across the hip, I would apply small snaps to hold it to the pocket. That is not necessary on this jacket.
Here is the black jacket finished and ready to wear. The photo lighting could be better but you get the idea.
Fit and workmanship are good. I am satisfied with the jacket and expect to wear it for many years. I'd like to stitch a pair of copper colored trousers with a black side seam tuxedo stripe to compliment the jacket. Black trousers and jeans will work fine also.
I allowed a small amount of ease in back for arm and shoulder movement. I could add a blouse or thin sweater for cooler weather. The shoulder line is strong without falling into 1980s fashion. I think my hips look narrower than they really are due to shoulder line and overall good fit.
Don't be discouraged if you don't like to hand sew. The beige jacket is completed by machine and the results are still fine. Here the lining is assembled similar to the fashion fabric due to the complex seaming.
 |
| Back lining with 1" center back ease pleat |
Front facings and under collar must be joined to lining now because I am not using a back neck facing. You can use a back neck facing or line to the neck edge; I think both methods look good.
 |
| Front lining attached to front facings |
The black jacket closed with hooks. Here I'll use a separating zipper. Machine baste the zipper in place and verify the tops of the zippers end at same place on the left and right jacket fronts.
 |
| hems stitched after zipper is basted in place |
Machine stitch the front facing/lining unit to the jacket along center fronts from the top of the collar to the front princess seam at the hem.
I machine stitched the outer edges of the upper and under collars together, favoring the upper collar 3/8". In other words, I increased the size of the upper collar along the finished edge to improve the roll of the collar. I want the collar to roll rather than stand straight up.
To turn the collar right sides out, I folded the upper collar seam allowances into a nice square.
Then I folded the under collar seam allowances into a nice square. I tacked them in place with a few hand stitches. I don't clip across the point at an angle unless I can't get nice collar corners with folding of seam allowances.
Since my fabric has texture and sewing threads disappear, I will hand sew the neck upper and under collar neck edges together. The traditional method is to catch stitch the seam allowances together by reaching inside the lining and between the layers. I would do that if I thought my hand stitches would show on the outside. This stitching locks in the roll of the collar.

I hemmed the jacket by catch stitching in place by hand. The pockets extend to the hem so they are stitched after the hem is in. I use my pocket flap template to mark an accurate shape with disappearing marker on the right side of the interfaced pocket flap. Assembly of the pocket flap, pocket and linings are the same as for the black jacket. You can certainly assemble them by machine, but I like the control hand stitching provides. The pockets were top stitched to the jacket side fronts along the edge and 1/4" from the pocket edge. All four sides of the pocket flap are clean finished with lining; I don't leave the top edge raw, stitch to the jacket upside down, turn down etc. as this is a bulky method and my fabric is bulky.
The finished pocket and pocket flap lay so smoothly! You can barely see the machine stitching.
A final press and the jacket is complete. Here is a close up of the center front zipper. The zipper does not extend to the hem so the hem won't be stretched when I sit.
The jacket has a nice amount of wearing ease which is more flattering than a jacket that sits tight across the abdomen. The collar and shoulder areas are curved and smooth. The belt is a nice detail that keeps the eye focused on the jacket center.
I lined the sleeve to the edge to avoid the rough fabric rubbing my skin. I like the look of the pink charmeuse peeking out though it is really not visible when the jacket is worn.
The back view shows a well rolled collar and interesting princess seams.
I hope you enjoyed reading this article. I'd love to hear what you think of Marfy jacket patterns, and if you could send photos of your finished garments, that would be even better!


 I opened the shoulder seam 1" total at the notch to add room for my shoulder size and a shoulder pad.
 Here
I pinned out excess fabric at the bust. The side front panel does not
need correction. The center front panel is where the excess fabric
needs to be removed. I know this because the princess seam lays to the
left/side of the bust center.
Here
I pinned out excess fabric at the bust. The side front panel does not
need correction. The center front panel is where the excess fabric
needs to be removed. I know this because the princess seam lays to the
left/side of the bust center. 


 Shoulder Yoke and Lower Front Sleeve


I think I may sew this along with you. I'm a bit intimidated by this, even though I've been sewing for years, and have my BFA in fashion design. I'm a pretty good seamstress, but patterns that I didn't make sometimes intimidate me. And fitting issues intimidate me. I'm nervous, but excited!
ReplyDeleteI LOVE this pattern and your ability to alter and fit yourself amazes me! You are my new sewing hero! Please keep sewing and posting and teaching. I am inspired and want to see more of your work!
ReplyDeleteHello! Just found your blog via SG's thread on Marfy patterns. These jackets are AMAZING!! Love the first one in the copper and brown/black colours. Thanks for posting all the construction details. A lot of work for some truly wonderful garments.
ReplyDeleteHi there,
ReplyDeleteJust spending a quiet time looking through this article on your blog.
Stunning as always and totally inspirational. Your jackets look absolutely superb on you. Good health when wearing them!
Hi there,
ReplyDeleteJust having my morning coffee whilst looking through your jacket article.
As always, simply stunning both the work and the fit on you.
Truly inspirational as always. Thank you so much for sharing your talent with us all; it pushes us in our sewing rooms.
You look wonderful in both jackets - good health when wearing them!