 |
| Pattern Jacket Front - Simplicity 2339 | | |
|
This tutorial is written for beginning and intermediate sewers hence it is very long and detailed. I have divided the tutorial into three parts to make accessing the information less time consuming for you. The three parts will be updated regularly with the shirt being completed mid July 2012.
Simplicity 2339 is a great fitting pattern because it drafts a blouse front for each cup size from A to D. Most patterns are drafted only for a B cup, so larger cup sizes end up with gaping armholes and tightness across the chest.
Select your pattern size based upon your full bust measurement. My full bust is 36", B cup; Simplicity calls me a size 14. The pattern tissue front piece 1B says size 14 will make a final garment that measures 39.5" in the bust. I like fitted clothing so I decide to instead cut a size 12 which will be 37.5" in the bust. I am not broad shouldered nor thick in the neck so fit should be fine in the smaller size.
The pattern tissue indicates a final size 12 waist measurement of 31.5" which is more than 1" larger than my waist so no change is needed here.
The pattern tissue does not indicate a hip measurement so I measure the pattern front, back, and front band pieces at the hip, subtract 5/8" seam allowances, and determine that a size 12 will measure approximately 40" in the hip. That is a little snug for me and I don't want the blouse straining across my abdomen, so I measure the size 14 hip. The size 14 hip is 42 3/8" which is a nice amount of ease, so I blend the pattern side seams from a size 12 at the waist to a 14 at the hip. Change the front and back side seams by an identical amount; the side seams need to match in length and shape.
 |
| Blend between waist and hip with a french curve |
Next fit check is the sleeve: will it ease nicely into the armhole? I measure the armhole of the size 12 using the front, back, and back yoke pattern pieces subtracting 5/8" seam allowances. The total measurement is 17 5/8". I measure the size 12 sleeve and it is 20.25". The difference is almost three inches! In my opinion it is impossible to ease 3" neatly and this is a pattern drafting error. I measure the size 10 sleeve and it is 19.5". With a size 10 sleeve I will need to ease 2" which is manageable. If you are an advanced sewer and understand pattern drafting, I recommend you reduce the ease to 1" checking that the sleeve will not be too narrow around the bicep. Beginners should just select one sleeve size smaller than the size they are cutting in the bust area.
Would you like to simplify the sewing of the collar and neckband while improving the quality? These pattern pieces are created from the pattern collar and neck band. The modified collar and neckband eliminate seams at the collar and neckband sides and move them to center back on the under collar and lower neckband.
 |
| Modified collar and neckband pattern pieces |
|
To create the modified collar, start with a large piece of paper or cardboard. Draw the 5/8" stitching line on the left half of your pattern pieces (red ink dashes).
Draw a line to mark center back.
Trace the left half of the pattern piece cutting lines with a ruler or french curve.
Mark the center front
stitching lines (red dash lines).
Flip the pattern tissue over
matching stitching lines, not cutting lines. Trace the pattern pieces again.
Add a 5/8" seam allowance.
 |
| The 5/8" seam allowance extends past center back |
|
Mark original notches and dots as indicated on original pattern. Your collar and neckband pattern modifications are complete.
 |
| The modified collar pattern is complete |
|
The neckband is redrafted in the same manner. Here are photos illustrating the steps:
The completed neckband pattern.
Last step: create a sleeve placket pattern. Dig through your old pattern stash and see if you can find this pattern piece, otherwise create one to these dimensions:
 |
| Cut 2 of the Sleeve Placket |
|
Enough analyzing and changing the pattern. Cut out the pattern pieces and mark as follows:
 |
| Cut two sleeves, four cuffs (interface two), and two sleeve plackets |
Two cuffs are interfaced with woven cotton interfacing, and the other two are not interfaced.
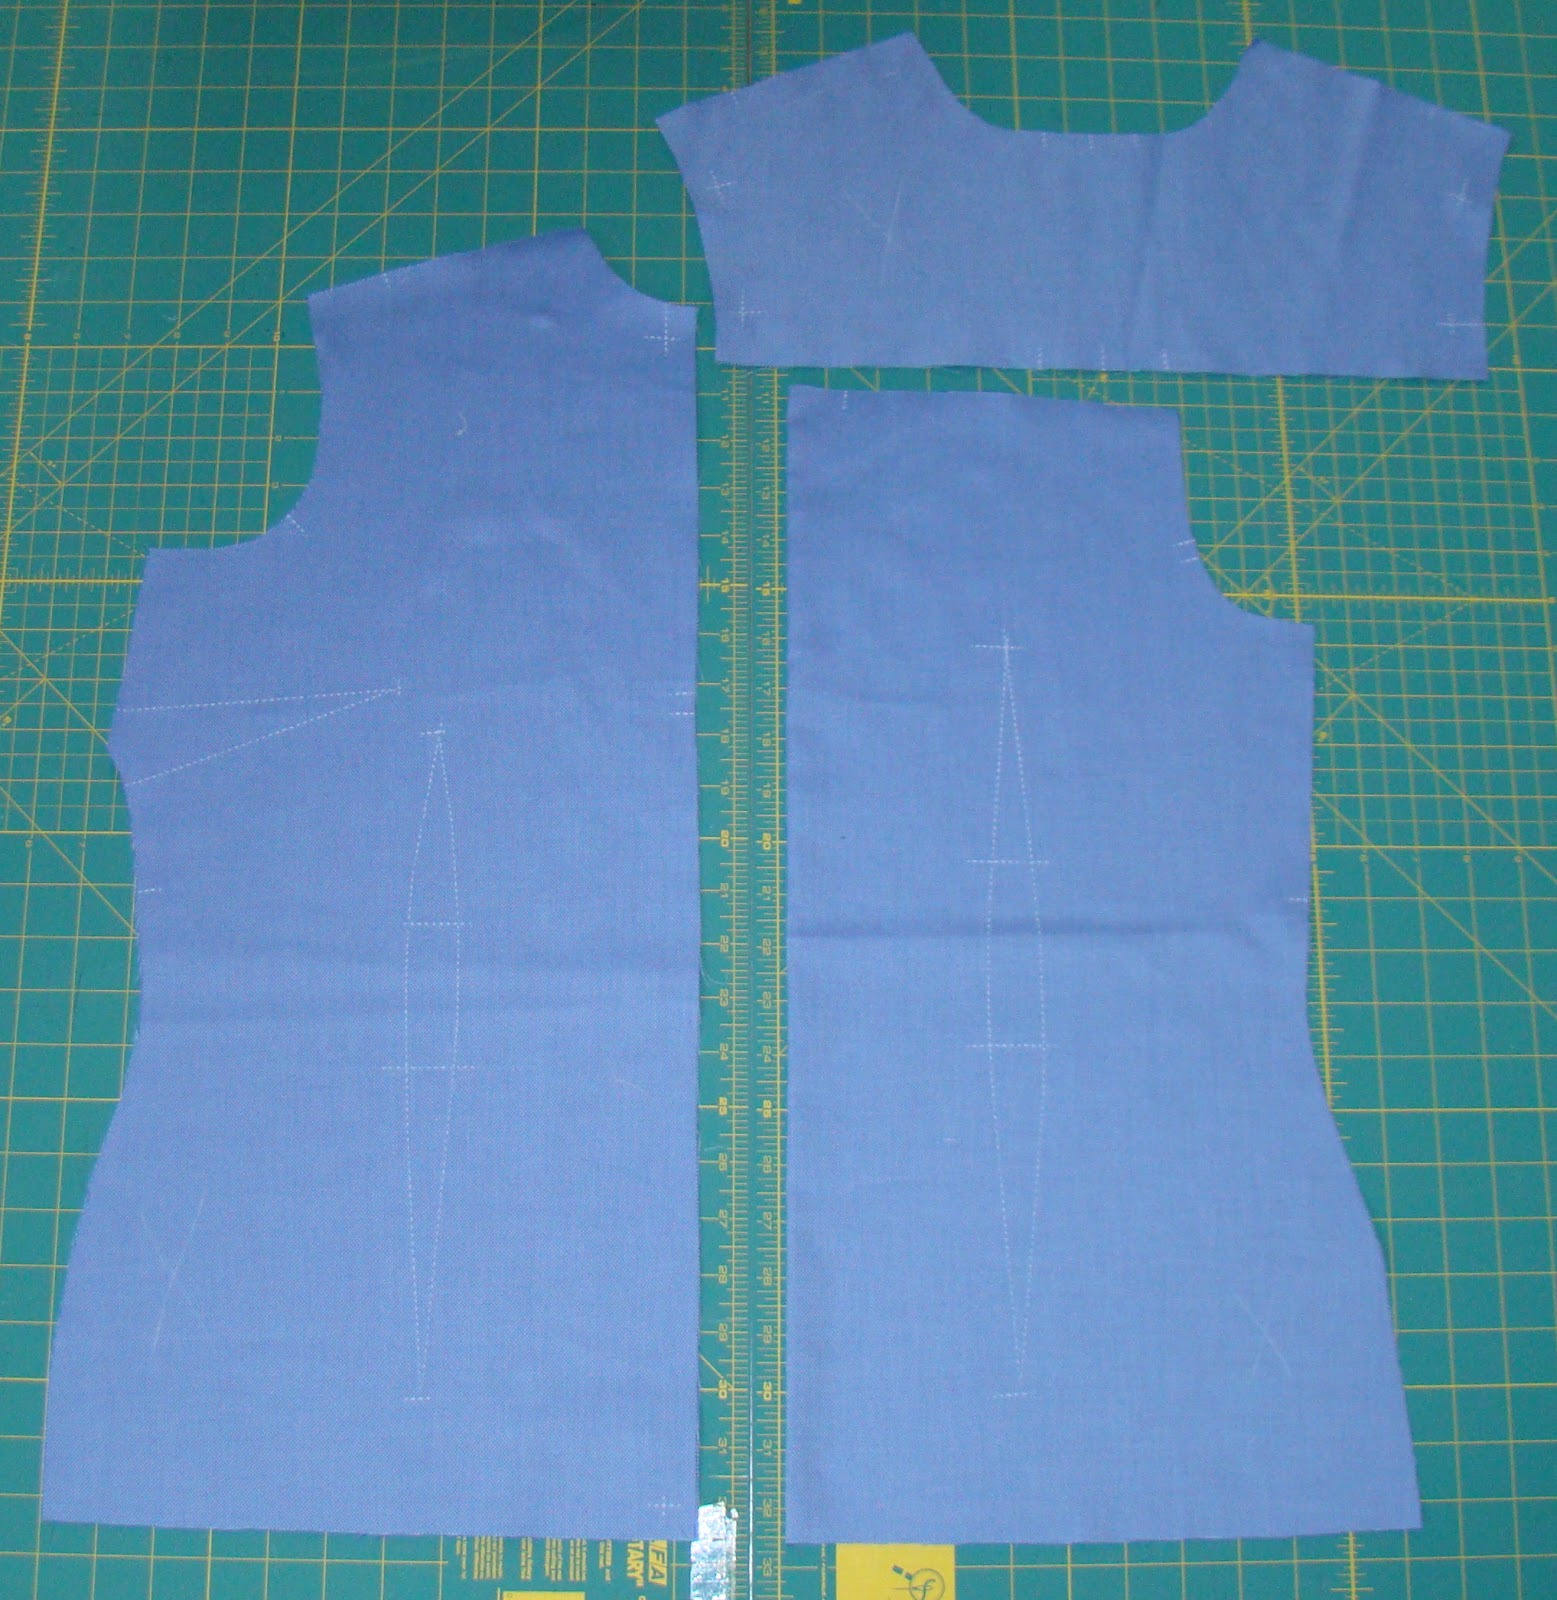
 |
| Cut two fronts, backs and yokes |
|
Mark darts with tracing paper. Mark notches with 1/4" cuts in the seam allowances or draw dashed lines with tracing paper. Well marked fabric makes sewing fast and easy. Unmarked fabric is painful to sew, and your accuracy will be diminished.
 |
| Cut one modified collar on a fold (interface), one modified neckband on a fold (interface), one chest pocket on the bias grain, and two front bands (interface) |
I used woven cotton fusible interfacing on the front bands which is ideal for most shirts. I used a lighter weight fusible knit interfacing on the collar and neckband because the modified pattern placed interfacing on both the upper and lower pieces. Cotton interfacing would be too firm for these two pieces. Cut one chest pocket out on the bias grain.
If you don't understand how to mark your pattern pieces, you will be able to see the marking up close during construction.
Next we'll start sewing.
To sew nice darts, examine these samples:
 |
| Start at wide part of dart |
Darts should be marked with tracing paper and tracing wheel; mark both dart legs. Stitch down dart leg towards point.
 |
| Stitch right along fold the last 1/2" before dart point |
|
|
|
The 1/2" before the dart point you should be stitching right along the fold, 1/8" away at most. Redraft the dart legs if necessary to achieve this. You are trying to avoid cupped puckers at the dart point.
 |
| loop back to 1" above dart point, threads are still connected to machine |
Do not back stitch at the dart point. Stitch off, lift up the presser foot, and position the needle 1" above the dart point. Stitch 4 or 5 stitches, no back stitching, then clip threads. Here is the completed dart:
 |
| Nice dart! |
When you press darts, you are building shape into the garment front.
 |
| bodice front on wrong side |
The garment will no longer lay flat on the table; there are curves built in by the darts. Darts are pressed to the center and down, generally speaking. Now is a good time to stay stitch the neckline. To stay stitch, start at the shoulder and stitch to center front a little less than 5/8" from the cut edge.
 |
| stay stitch the back yoke |
|
To stay stitch the back neckline, start at the shoulder point and stitch halfway into the neckline. Then flip the panel, start at the other shoulder point, and stitch the remainder of the neckline. Your 2 stay stitch lines should overlap for 1/2".
 |
| back darts stitched and pressed |
|
Pressing demo: Press dart flat on one side.
 |
| press one side of dart flat |
|
 |
| press other side of dart flat |
|
Lay garment over a pressing ham, wool/plaid side up for natural fibers, cotton side up for synthetics. The bust area should be positioned over the curviest area on the ham.
 |
| dart points pressed on ham |
|
 |
| stand ham on ironing board to improve garment shape |
|
 |
| What nice darts! |
Please go to Part Two to complete the tutorial.


No comments:
Post a Comment