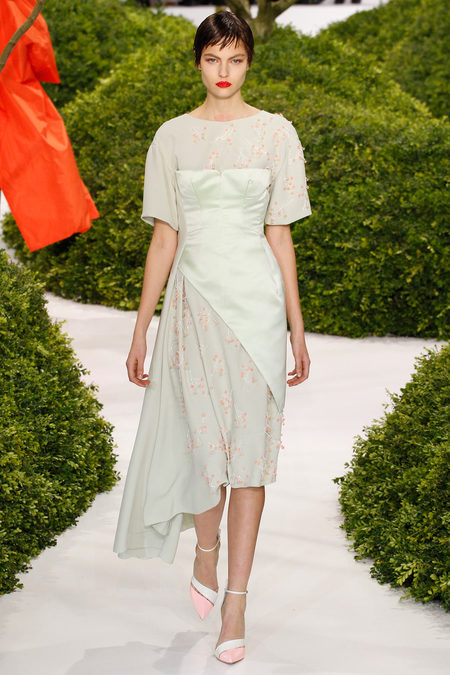
On May 20, 2013 I posted an article about sewing a dress inspired by this garment from the Christian Dior Spring 2013 Couture Collection.
I made the under dress from silk charmeuse and Vogue pattern 8894. The pattern alterations and sewing details were discussed in the 5/20/13 post.
 |
| Vogue 8894 with the hem line altered |
Now I'm working on the overdress. For the pattern I used a design from an old Burda Style magazine which is no longer available for purchase. I chose the pattern because of the bust details. If you are an advanced sewer, you can modify a pattern to include the bust details. If you are a beginner or intermediate sewer, you are better off using a pattern such as Burda 7155 which has nice design lines but fewer bust detail. In a few photo slides you will see that the bust details are difficult to sew, so you really have to be up for the challenge. Anyway, the starting point is a strapless dress pattern that you like.
 |
| Muslin front with seams on outside for easy alteration |
I determined the fit and style corrections with the finished under dress on the form also, but for clarity I left the dress out of these photos. The Christian Dior dress has a left side seam that is approximately five times longer than than the right side seam. I determined this by measuring the seams in a photo printout. Through experimentation I decided a left side seam length of 18" and a right side seam length of 3.5" looked nice on me. The under dress left side seam length is 23".
 |
| Muslin back won't close above the waist |
The garment muslin fits well except that it doesn't close at center back at the bust. I added 3/4" to each back princess seam, tapering to no gain at the waist, for a total increase of 1 1/2". Good thing I checked or this garment would be miserable to wear.
I purchased my materials at Vogue Fabrics in Evanston, IL. You can purchase online from them at
http://www.voguefabricsstore.com/Fabrics-and-Netting-for-Corsets-and-Costumes/.
The left fabric is a black and red brocade corseting, or coutil. This
fabric will provide the structure for the overdress, and will not be
visible in the completed garment. Coutil is expensive, $33 per half
yard. For the overdress I purchased 1 1/2 yards of coutil. Once you
try coutil, you will no longer be satisfied with cheaper alternatives
such as duck cloth. The middle fabric is a red polyester duchess satin
which was $9 per yard. Interesting that my fashion fabric is so much
cheaper than my support fabric. The duchess is a lovely color and is
matte. I see little reason to purchase a silk duchess for this
project. The right most fabric is a polyester charmeuse, $6 per yard,
to line the overdress.

I cut out the garment panels in fashion fabric, silk organza, and coutil. The use of coutil for the skirt is a judgment call. The coutil is firm and the skirt may stand away from the body like a costume. If I don't use coutil in the skirt, it may crease and wrinkle more than I desire. The hard part of sewing is making decisions that may yield disappointing results. There is no avoiding disappointment when sewing; I could be disappointed in the finished garment because I don't like the way the coutil stiffens the skirt, and I could be disappointed that the skirt is too soft because I didn't use coutil. Find a way to make the process fun, and wear your garments whether or not they are "perfect," whatever that is.
 |
| Mark stitching lines for a more accurate garment |
Above is the center front bodice panel. On the left, you see the wrong side of the satin with fusible interfacing applied over the corners to strengthen them for future clipping. Silk organza is diagonal basted over the wrong side of the fashion fabric. On the right, you see the stitching lines marked on the wrong side of the coutil.
 |
| 1/4" spiral steel boning will be placed in the channels later |
I stitched the boning channels to the coutil panels. The boning tape is also purchased from Vogue Fabrics (Evanston store or online). The boning will be inserted later.
 |
| I prefer 1/4" spiral steel boning to 1/2" spring steel (way too firm) |
The coutil is then diagonal basted to the wrong side of the fashion fabric/organza panels. On the left you see the diagonal basting threads (silk) on the fashion fabric right side. On the right you see the coutil with boning channels basted to the fashion fabric.
Next stitch the seams and press open. I do not stitch the seam allowances together above or below the seams as those stitches would make it more difficult to shape the garment later. This is the outside of the bodice. Note the curved seams do not hold a crisp press due to their bulk
 |
| bust is highly defined with curved seams |
The inside of the bodice is difficult to handle due to bulk and curve issues. This is why I told beginner and intermediate sewers to not torture themselves with too many bust seams.
 |
| Tame these seam allowances with hand fell stitches |
I maintain a collection of spiral steel boning in various useful lengths, also purchased from Vogue Fabrics. If necessary I cut these lengths with bolt cutters and attach new end caps with glue and pliers.
 |
| 1/4" spiral steel boning |
Insert boning in the channels. The boning should not extend into the seam allowance at all, and there should be allowance for turn of the cloth.
 |
| Insert boning as late in the construction process as is possible (stiffness makes garment difficult to handle) |
Hand fell the seam allowances down. See how manageable the bodice cups eventually become.
 |
| left side has beem trimmed and fell stitched |
The bodice seam allowances have been hand stitched in place, so the outside of the garment looks neat and will hold the desired shape.
 |
| Fell stitches are needed to maintain the pressed seams |
If you wished, you could use under wire under the bust. Below is under wire and under wire channeling. In the future I should write a post on using these materials. I opted to not use under wire in my garment.
 |
| Under wire supplies |
The skirt seams are stitched, and the seam allowances are hand felled in place. Below is the skirt front.
The skirt will have a separating zipper at center back.
Below is a view of the inside of the skirt. Look at the shape built in! The shaping is the result of the coutil, the curved seams, and the hand stitching to hold the seam allowances in place. If I omitted or changed any of those factors, the result would be different. I am very happy with my decision to place coutil in the skirt. I think the over dress will be quite dramatic, and I like strong design lines.
The bodice and skirt are ready to be joined together. At this point in the construction process, I am very happy, and I am confident the garment will be what I want. It was a lot of work to reach this point. If I wasn't happy, this would be the time to rip and redo. If you find that at this stage you don't like the garment or have lost interest in it, then put it aside, perhaps toss it out. Your time and money have been spent and you cannot recover them. I wouldn't add additional time or money to a project I disliked.
I'll finish the dress up this week and let you know the results.


I am swooning at your construction skills. When I grow up I want to be able to sew this well!
ReplyDelete