 |
| Marfy 2762 catalog sketch |
I traced around the pattern pieces directly onto unbleached unwashed cotton muslin. I added 1/2" seam allowances, grain line arrows, notches, and pocket placement lines. I used only these six pattern pieces: Front, Side Front, Side Back, Center Back, Shoulder Yoke, and Lower Front Sleeve. Here are the pattern shapes:
 |
| Center Front pattern |
 |
| Center Back pattern |
 |
| Side Front and Side Back patterns |
 |
| Yoke/Sleeve and Lower Front Sleeve |
 | |||||||
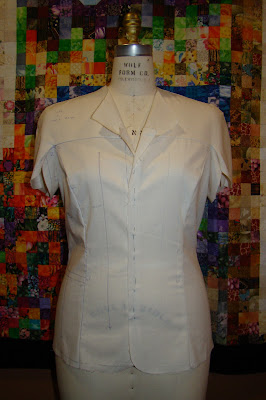
| Marfy 2762 Jacket Front view |
Here is the muslin on my dress form.
My initial observations on garment front fit:
1. The jacket is too large in the bust, both at the princess seam and the side seam.
2. The waist is large
3. The abdomen/hip area is tight.
4. While the shoulders look smooth on the dress form, the garment feels tight across my shoulders and there is no room for a raglan shoulder pad. I want strong shoulder emphasis which requires a shoulder pad.
5. The two piece sleeve detail is a nice design feature, but there is no good way to sew these seams neatly and professionally (the lower front sleeve panel has a top seam allowance that hangs suspended with no armscye seam to join). What a nightmare it would be to line this sleeve.
 | |
| Sleeve Detail Jacket Front |
 |
| Back view Marfy 2762 |
Notes on garment back view fit:
1. Garment lays nicely but it is a little roomy center back at the waist.
2. Again, a little more hip room would be flattering.
 |
| pinching center back at the waist |
 I opened the shoulder seam 1" total at the notch to add room for my shoulder size and a shoulder pad.
 Here I pinned out excess fabric at the bust. The side front panel does not need correction. The center front panel is where the excess fabric needs to be removed. I know this because the princess seam lays to the left/side of the bust center.
 I am going to add circumference to the abdomen/hip in the princess seams rather than the side seams. The reasons are (1) I want to avoid a steep hip curve that would look unnatural and (2) the abdomen and bum are what needs additional circumference and they are more towards the center of the body.
 |
Center Front: I added 1/4" to the hip here.
I removed 5/8" from the bust (black ink scribbles to be cut away) and folded out 1/2" in length at the bust. The princess seam will now run over the bust point rather than to the left of it.
 |
| Side Back - Added 1/4" to hip |
 |
| Side Front - added 1/4" to hip |

Center Back: 1/4" added to hip.
Added 1/2" at the shoulder notch, tapering to nothing at the neck and sleeve hem.
Added 1/4" to upper center back to allow extra shoulder room.
Removed 1/4" from waist (black scribble section will be cut away).
 Shoulder Yoke and Lower Front Sleeve
Joined Lower Front Sleeve permanently to Yoke/Sleeve.
Added 1/2" to shoulder at notch, tapering to nothing at the neck and sleeve hem.
I plan to sew the jacket in two fabrics. The black fabric will be underlined with silk organza, and lined in silk charmeuse or silk habotai. The beige jacket will be underlined with fusi knit interfacing and lined with polyester charmeuse. If you are sewing along with me, you should obtain both underlining and lining material in the same yardage as the fashion fabric.
| Black/copper beaded designer fabric |
 |
| Beige silk tussah fabric |
These are the shoulder pads I plan to use.

No comments:
Post a Comment